Animated Video Scroll Render for Web with Bodymovin & ScrollMagic JS
Steps to create and implement a animated video render scroll in your website using Bodymovin and Scroll Magic JS....
By John Phung
2020-10-04
One of the current trending theme to get a slick looking product showcase on your website is using an animated scroll render, which you may have seen from Pixel and Apple.

In this article, I will outline the process which I was able to convert a mp4 product video into a scrollable animated version used to embed on a website. The following softwares/plugins are required:
- Adobe After Effects CC
- Adobe Media Encoder or similar software that can convert video to image sequences
- Bodymovin plugin (Installed through creative cloud marketplace or download from https://github.com/airbnb/lottie-web found in the build/extensions folder — Install using ZXP installer.
- A code editor such as Visual Studio Code to write the necessary javascript
Step 1 — Create Image Sequence
Convert the video into an image sequence using Adobe Media Encoder. In the workspace click the plus icon under Queue to add the video file. Then in the preset browser, find Image Sequence > PNG or JPEG (match source) and drag and drop it over the queued video file to apply the preset. Set the output file path to a new folder and lastly, press the green play button to start the encoding process. This process should create frame snapshots of the entire video. It may be necessary to reduce the frame rate of the output if the video is too long to reduce the overall JSON file size later on.

Step 2 — Install Bodymovin Plugin
Install bodymovin plugin for After Effects. You can either install it through Creative Cloud marketplace plugins or download it directly and install it. In this article, version 5.3.1 is used.
Step 3 — Import into After Effects
Open Adobe After Effects and create a new project. Next drag and drop/import multiple files all the generated image sequence files into the asset panel in After Effects (This panel is usually found at the top left section).

Once all images are loaded, you want to selected all the images and drag it into the composition panel located just beneath. Doing so will trigger a popup to create a new composition from selection.

Input the setting as shown in the screenshot above. Press ok, and you should see all the image sequenced in order.
Step 4 — Export as JSON using Bodymovin
Go to Window — Extensions — Bodymovin to open the plugin. Select the current composition so that it shows a green circle.

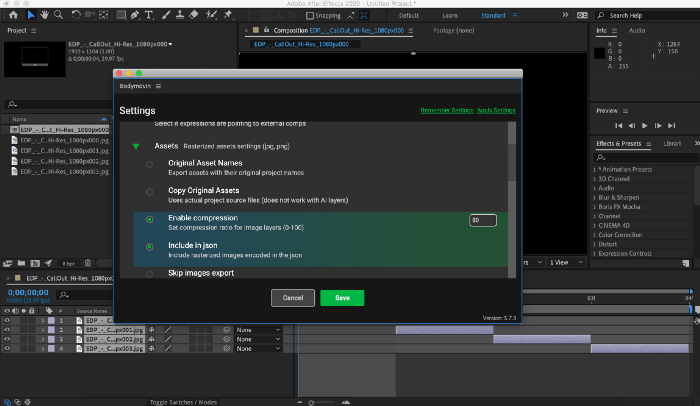
For the settings, you want to enable Glyphs, Assets — Enable Compression (A value you desire), include in JSON and export mode using standard. Set a destination output file and you’re ready to start rendering.
Note if the render fails, a fix which worked for me was to go to Preferences -> Scripting & Expressions -> Application Scripting and enable“Allow scripts to write files and access network”.
Step 5 — Import scripts into HTML Head
To create the animated scroll render on a website, a few libraries are required — ScrollMagic and Bodymovin Lottie. Paste those scripts in the head section of the HTML file.
1<script src="https://cdnjs.cloudflare.com/ajax/libs/ScrollMagic/2.0.7/ScrollMagic.min.js"></script>
2<script src="https://cdnjs.cloudflare.com/ajax/libs/ScrollMagic/2.0.7/plugins/animation.gsap.js" integrity="sha256-peenofh8a9TIqKdPKIeQE7mJvuwh+J0To7nslvpj1jI=" crossorigin="anonymous"></script>
3<script src="https://cdnjs.cloudflare.com/ajax/libs/bodymovin/5.7.3/lottie.min.js"></script>
Step 6- Create Container for Animation
The animation will be injected based on the element ID created in the HTML file. The class ‘intro’ here just modifies the container to be 100% width and 100% height. The element ID lottie is what will be referenced in the javascript to initialise the JSON file.
1<section class="intro">
2  <div id="lottie"></div>
3</section>1.intro {
2 width:100%;
3 height:100%;
4}Step 7 — Initialise ScrollMagic and Bodymovin
In the javascript file you need to initalise ScrollMagic and Bodymovin. There are several options you can tweak such as the animation time which affects how fast or slow the frames will switch relative to the scroll height. Additionally you could add another animations to other DOM elements using ScrollMagic.
1const intro = document.querySelector(".intro");
2
3const controller = new ScrollMagic.Controller();
4
5// set desired animation time long enough so that it doesn't skip frames when scrolling fast.
6  const animationTime = 2427;
7
8// initialise scrollmagic scene
9  let scene = new ScrollMagic.Scene({
10    duration: animationTime,
11    triggerElement: intro,
12    triggerHook: 0,
13  })
14    .setPin(intro)
15    .addTo(controller);
16
17// initalise bodymovin
18
19const elem = document.getElementById("lottie");
20let anim;
21
22let delay = 0;
23let heightPerFrame = 0;
24
25scene.on("update", (e) => {
26  heightPerFrame = anim.totalFrames / animationTime; // if total animation duration === total frames, then 1px height scroll = 1 frame moved
27  delay = Math.round(e.scrollPos * heightPerFrame);
28  anim.goToAndStop(delay, true);
29});
30
31const animateData = {
32  container: elem, //
33  renderer: "svg",
34  loop: false,
35  autoplay: false,
36  rendererSettings: { progressiveLoad: false },
37  path: "data.json", // path to json file
38};
39
40anim = lottie.loadAnimation(animateData);
Step 8 — Appreciate the Scroll Magic
This is the result of the scroll render. Further optimisations to the animation time and frames per scroll will improve the smoothness of the frame switching.

The above demo Github can be found here.