WooCommerce and PFC Express Integration with Webhook & Node
By
John Phung
Overview
In this article, I will outline how to create a webhook from WooCommerce to send order information to the PFC express endpoint, which will create either an order or fulfilment for products that are warehoused by PFC. This is typically an automation process for sellers that manufacture products in China and are delivering it internationally.
Setup
You should already have WooCommerce store setup and an PFC Express account with stock located in any of their warehouses.
Connecting to PFC Express API
For starters, you may refer to their API documentation http://www.pfcexpress.com/webservice/enAPIDoc.html#8.1
If the documentation is confusing for you, I will run through testing the PFC Express API using Postman. PFC Express has two versions of API which you can access. For all except one, it uses v1 and for creating an order there’s a v2 API.
I will cover both versions for testing.
Version 1
The endpoint is http://www.pfcexpress.com/webservice/APIWebService.asmx/{functionName}
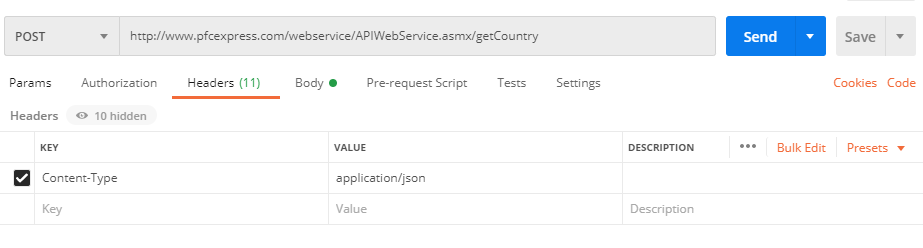
To submit a request, you must use a “POST” method and pass along a secret key in the body which is the API key generated from the PFC Express platform. Below I’m testing the getCountry endpoint by passing along the key pair value “secretkey”: “apikey” as raw JSON.

By passing along JSON body, you will also need to set the header content type to application/json.
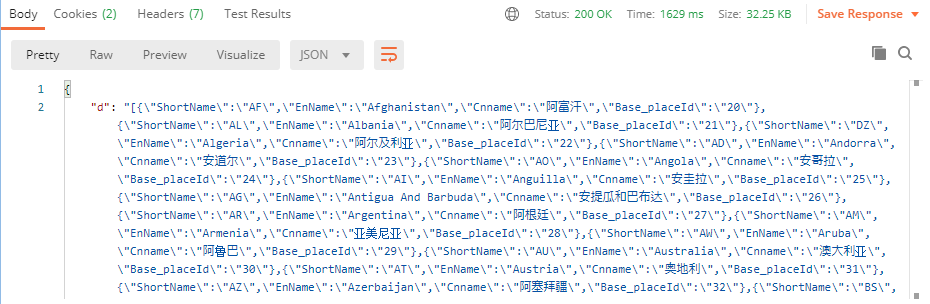
Once the header and secretkey is set, you can attempt to send the request to the endpoint. If successful, the results should return an JSON array of objects with country names and shortcode.
Version 2
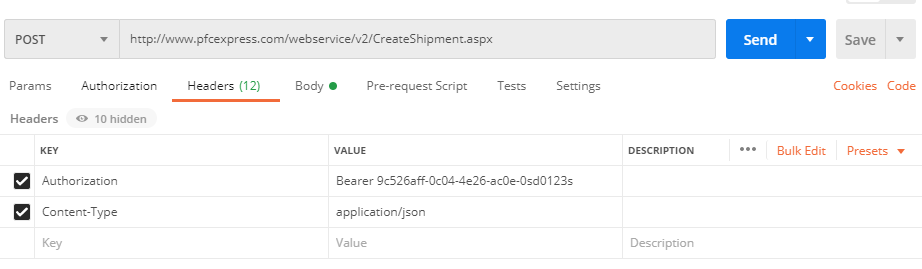
V2 of the API only applies to the endpoint function createOrderV2, which is essentially an upgraded version of createOrderV1. It uses different authorization with Bearer header, however, the way to submit data is the same. As a header you need to add “Authorization”: “Bearer apikey”.
Sending Order to PFC Express - CreateShipment endpoint
Out of all the endpoints, sending an order is the most problematic if you don’t understand the required body data. The documentation provides guidance for .NET, PHP and Java but not node. Logically, the structure is almost the same but some boilerplate would have been nice.
In this section, I will simply copy the provided body JSON data from the docs (found at createOrderv2 section) and explain the important data points to make the request work.
1{2 "Type":2, // 1 fulfilment, 2 for ordinary order3 "CustomerId":"107085", // your account ID - this is mandatory4 "ChannelId":158, // This is mandatory and refers to the base channel ID for shipping providers for a certain country. You can find the channelId from http://www.pfcexpress.com/webservice/APIWebService.asmx/getChannel. You will need to filter based on country code to determine what channelId to use.5 "INorOut":0, // 0 for exports - most common6 "IDCardNo":"",7 "Remark":"",8 "Products":[9 {10 "Price":64,11 "SKU":"FC0001", // The SKU from woocommerce must match the SKU from PFC product list, otherwise, the order won’t go through12 "Length":0.1, // Pulled from Woocommerce webhook payload line_items meta data13 "EnName":"Example Product Name",14 "High":0.3,15 "ProducingArea":"China",16 "CnName":"",17 "HSCode":"",18 "MaterialQuantity":1,19 "Weight":0.1,20 "Width":0.221 }22 ],23 "ShipToName":"John Phung",24 "ShipToAdress1":"123 Short St",25 "ShipToAdress2":"",26 "ShipToCity":"Sydney",27 "ShipToState":"NSW",28 "ShipToCountry":"AU",29 "ShipToCompanyName":"",30 "ShipToZipCode":"2000",31 "ShipToPhoneNumber":"04487478745",32 "OrderStatus":1, // 0 for draft, 1 to be sent and 2 - is sent. Usually 1 to be sent.33 "WarehouseId":"302", // You can find the warehouse ID from the fulfillment dashboard on PFC website, alternatively, you can go here http://www.pfcexpress.com/webservice/getWarehouse.htm and enter your API key to get the list of warehouse ID’s.34 “Sender":"huangjia",35 "SendEmail":"sales@pfcexpress.com",36 "SendAddress":"4th Floor, Building C, No.2, Road 1,Shangxue Science and Technology Park,Bantian street, Longgang District, Shenzhen, Guangdong Province, China",37 "SendCompany":"www.parcelfromchina.com",38 "SendPhone":"0755-83727415",39 "TrackingNo":"",40 "CODFee":0,41 "BatteryFlag":0,42 "CsRefNo": ""43 }
After entering all the body data into postman, on a successful request you will get a status 200 with msg success. See below screenshot.
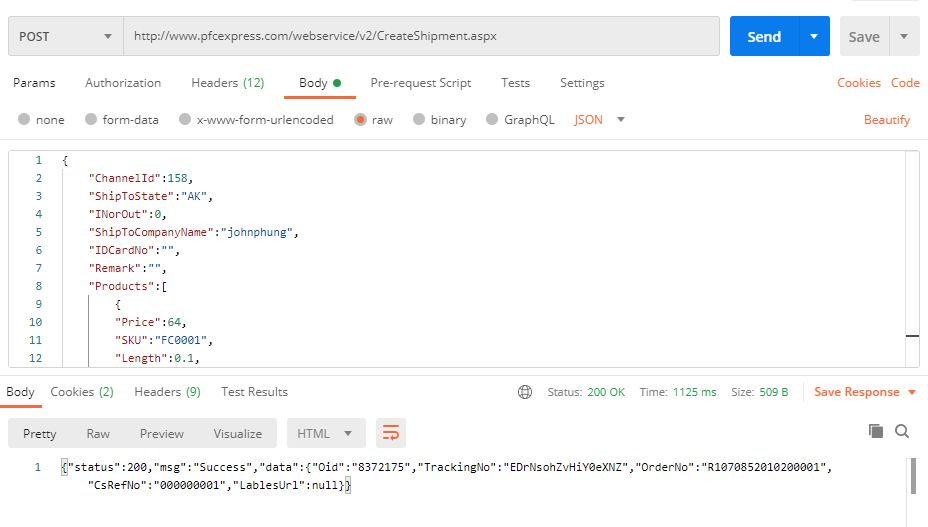
That wraps up the testing portion. Now it’s time to write the webhook to transfer data between Woocommerce and PFC Express.
Writing The Webhook Using Cloud Function
To approach writing the webhook, there two ways you can go about it; 1) Creating a server endpoint or 2) Create a cloud function.
I will be creating a cloud function since I’m not concerned with receiving a payload response and having it run in the background is sufficient.
I will be using firebase cloud functions in my setup, however, using a different cloud function provider or setting up an express route will not drastically change the core functional code - perhaps only the middleware setup.
Checking Hash Authentication from Woocommerce Payload
To make sure the request is coming from Woocommerce, Woocommerce hashes the body data and also sends along a hashed signature header called x-wc-webhook-signature. Thus, we need to decode the hashed request body and compare it to the request header. The code below outlines this process.
1const crypto = require("crypto");2const fetch = require("isomorphic-fetch");34exports.wooComPushToPFC = functions.https.onRequest((req, res) => {5 const method = req.method;6 const headers = req.headers;7 const data = req.body;89 if (method !== "POST") {10 res.status(501).send("Incorrect req method");11 }1213 const secret = functions.config().woocommerce.secret; // your secret phrase set in woocommerce webhook - I will cover this later1415 const signature = headers["x-wc-webhook-signature"];1617 const hash = crypto18 .createHmac("SHA256", secret)19 .update(req.rawBody)20 .digest("base64");2122 if (hash !== signature) {23 res.status(501).send("Unauthorized access");24 }2526 console.log(data);2728});
Deploying the cloud function for testing
To test if the webhook is sending payload to the cloud function, we need to deploy it to get the URL which we would use as an input parameter for Woocommerce webhook settings. I won’t be covering this part of the process as it’s specific to your cloud provider / server environment.
Creating Webhook in Woocommerce
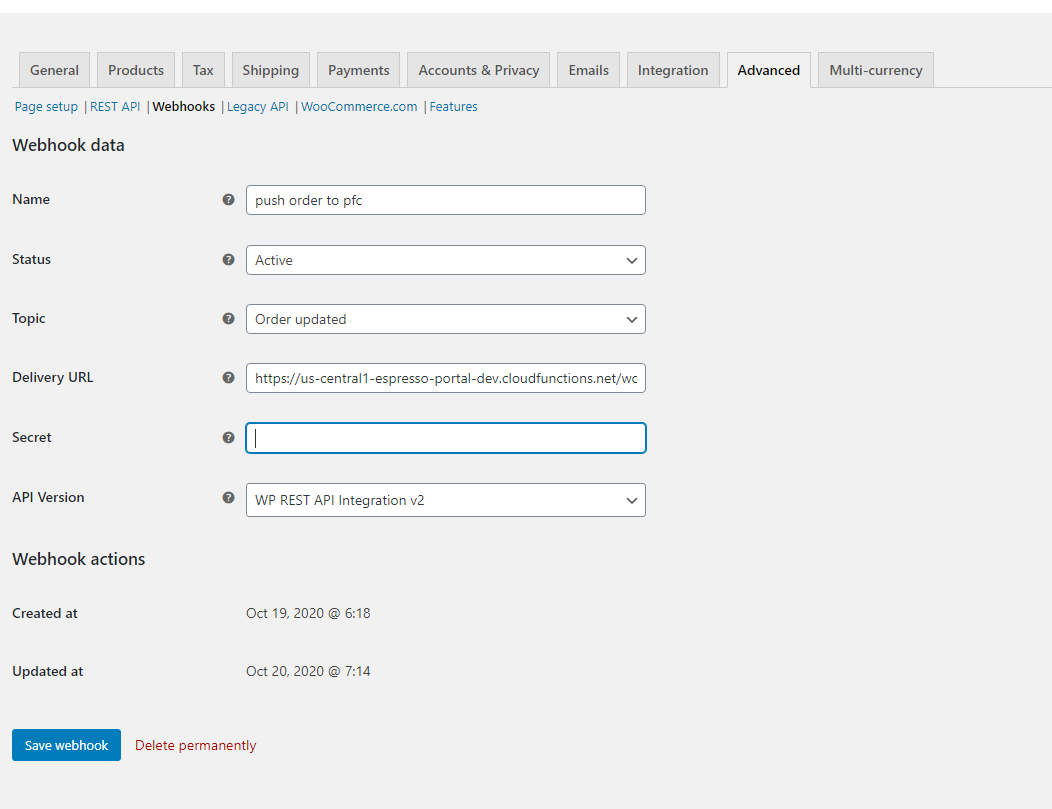
In your wordpress woocommerce go to settings > advanced > webhooks, then add webhook.
The webhook data: Name: Any name you prefer Status: Active Topic: Order.updated Delivery URL: The cloud function url or server endpoint when deployed Secret: random phrase of your choosing - we need this to decode the hashed body API version: 2
Destructuring the Woocommerce payload for order.updated action
After setting up the webhook in Woocommerce and deploying the cloud function, we can test to see if we can get the payload when the order.updated action is triggered. To trigger this action, either buy a product from your store or create an order from the orders tab.
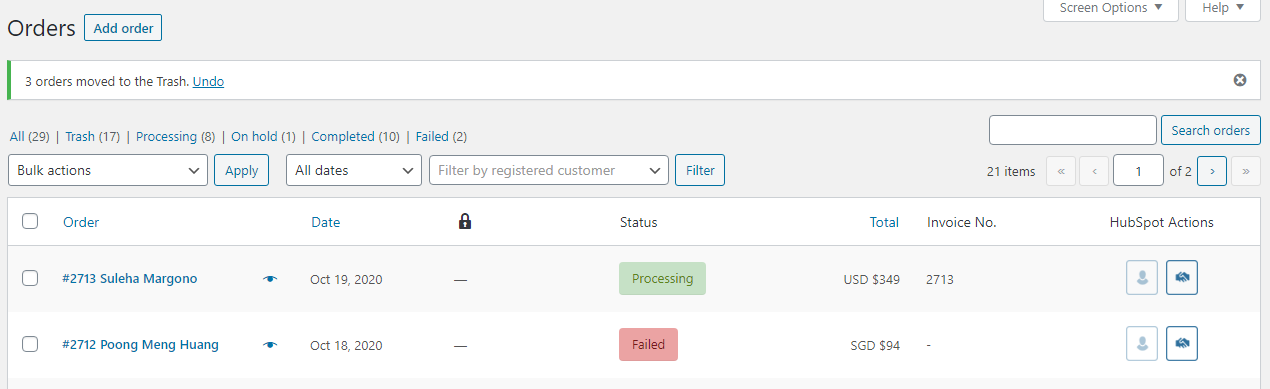
If the action triggered resulted in a log of the incoming data from the cloud function/server point, then you know it has been successful. In the case of a non-successful request, the webhook will toggle to disabled state, which you will need to update it back to active. If you wish to remove this feature, you will need to modify the woocommerce plugin source code.
The payload data should look like this
1{2 "id": 52,3 "parent_id": 0,4 "status": "pending",5 "order_key": "order_5836d85314887",6 "number": 52,7 "currency": "EUR",8 "version": "2.6.8",9 "prices_include_tax": false,10 "date_created": "2016-11-24T12:08:00",11 "date_modified": "2016-11-24T12:08:51",12 "customer_id": 0,13 "discount_total": "0.00",14 "discount_tax": "0.00",15 "shipping_total": "0.00",16 "shipping_tax": "0.00",17 "cart_tax": "0.00",18 "total": "0.00",19 "total_tax": "0.00",20 "billing": {21 "first_name": "Test",22 "last_name": "Test",23 "company": "Test",24 "address_1": "asd",25 "address_2": "123",26 "city": "Test",27 "state": "H",28 "postcode": "12345",29 "country": "DE",30 "email": "test@example.com",31 "phone": "123"32 },33 "shipping": {34 "first_name": "Test",35 "last_name": "Test",36 "company": "Test",37 "address_1": "asd",38 "address_2": "123",39 "city": "Test",40 "state": "H",41 "postcode": "12345",42 "country": "DE"43 },44 "payment_method": "paypal",45 "payment_method_title": "PayPal",46 "transaction_id": "",47 "customer_ip_address": "",48 "customer_user_agent": "",49 "created_via": "",50 "customer_note": "",51 "date_completed": "2016-11-24T12:08:51",52 "date_paid": "",53 "cart_hash": "",54 "line_items": [55 {56 "id": 13,57 "name": "Yellow Short With Variants",58 "sku": "YSWV-L",59 "product_id": 12,60 "variation_id": 22,61 "quantity": 1,62 "tax_class": "",63 "price": "6.00",64 "subtotal": "6.00",65 "subtotal_tax": "0.00",66 "total": "6.00",67 "total_tax": "0.00",68 "taxes": [],69 "meta": [70 {71 "key": "size",72 "label": "Size",73 "value": "L"74 }75 ]76 }77 ],78 "tax_lines": [],79 "shipping_lines": [],80 "fee_lines": [],81 "coupon_lines": [],82 "refunds": [],83 "_links": {84 "self": [85 {86 "href": "http://138.68.91.142/wp-json/wc/v1/orders/52"87 }88 ],89 "collection": [90 {91 "href": "http://138.68.91.142/wp-json/wc/v1/orders"92 }93 ]94 }95}
From the payload data, we will extract certain parts of it to create a new object that matches the format required by PFC Express.
Creating fetch function to push data to PFC
First is to check whether or not the order coming in is paid. A paid order is indicated by the processing status.
1const pushOrder = (data) => {2 return new Promise((resolve, reject) => {3 if (data.status !== "processing") {4 console.log("order not completed"); // we only want to push data when the order transitions to processing (paid)5 reject("Order not completed");6 }7 // construct object for PFC89 // POST data to PFC endpoint10 }11}
Next, we need to create a new line items array with the correct attributes required PFC
1const pfcEndpoint =2 "http://www.pfcexpress.com/webservice/v2/CreateShipment.aspx";34 let lineItems = [];56// creating an update line items array for the necessary object attributes for PFC7 for (let i = 0; i <= data.line_items.length - 1; i++) {8 let item = data.line_items[i];910 let temp_item = {11 SKU: item.sku,12 EnName: item.name,13 CnName: "",14 MaterialQuantity: item.quantity,15 Weight: item.meta[0].weight,16 Price: item.price,17 ProducingArea: "China",18 HSCode: "",19 Length: item.meta[0].length,20 Width: item.meta[0].width,21 High: item.meta[0].high,22 };23 lineItems.push(temp_item);24 }
Next, we need to create a JSON object to pass along in our POST request.
1const pfcData = JSON.stringify({2 Type: 2, // 1 fulfillment, 2 - ordinary3 CustomerId: "107085", // 0 account ID for pfc4 ChannelId: channelId,5 Sender: "huangjia",6 SendPhone: "0755-83727415",7 SendAddress:8 "4th Floor, Building C, No.2, Road 1,Shangxue Science and Technology Park,Bantian street, Longgang District, Shenzhen, Guangdong Province, China",9 SendCompany: "www.parcelfromchina.com",10 SendEmail: "sales@pfcexpress.com",11 ShipToName: data.shipping.first_name + " " + data.shipping.last_name,12 ShipToPhoneNumber: data.billing.phone,13 ShipToCountry: data.shipping.country,14 ShipToState: data.shipping.state,15 ShipToCity: data.shipping.city,16 ShipToAdress1: data.shipping.address_1,17 ShipToAdress2: data.shipping.address_2,18 ShipToZipCode: data.shipping.postcode,19 ShipToCompanyName: data.shipping.company,20 OrderStatus: 1, // I’ve tried other values which don’t work, 1 submits the order as a draft.21 TrackingNo: "",22 Remark: "",23 BatteryFlag: 0,24 INorOut: 0,25 CODFee: 0,26 IDCardNo: "",27 CsRefNo: data.order_key, //customer reference no28 WarehouseId: "302", //SZWH01深圳电商仓储中心29 Products: lineItems,30 });
Finally, we can construct our fetch request.
1const fetchConfig = {2 method: "POST",3 headers: {4 Authorization: "Bearer " + functions.config().pfc.apikey, //api key is stored as a env variable5 "Content-Type": "application/json",6 },7 body: pfcData,8 };910 fetch(pfcEndpoint, fetchConfig)11 .then((response) => response.json())12 .then((result) => {13 console.log(result);14 resolve(result);15 })16 .catch((error) => {17 console.log(error);18 reject(error);19 });
Now that the function to post data to PFC is created, we can call it in our original request function
1exports.wooComPushToPFC = functions.https.onRequest((req, res) => {2 const method = req.method;3 const headers = req.headers;4 const data = req.body;56 if (method !== "POST") {7 res.status(501).send("Incorrect req method");8 }910 const secret = functions.config().woocommerce.secret; //secret phrase set in woocommerce1112 const signature = headers["x-wc-webhook-signature"];1314 const hash = crypto15 .createHmac("SHA256", secret)16 .update(req.rawBody)17 .digest("base64");1819 if (hash !== signature) {20 res.status(501).send("Unauthorized access");21 }2223 return pushOrder(data)24 .then((result) => {25 res.status(200).send(result);26 })27 .catch((error) => {28 res.status(501).send(error);29 });30});
Testing the integration
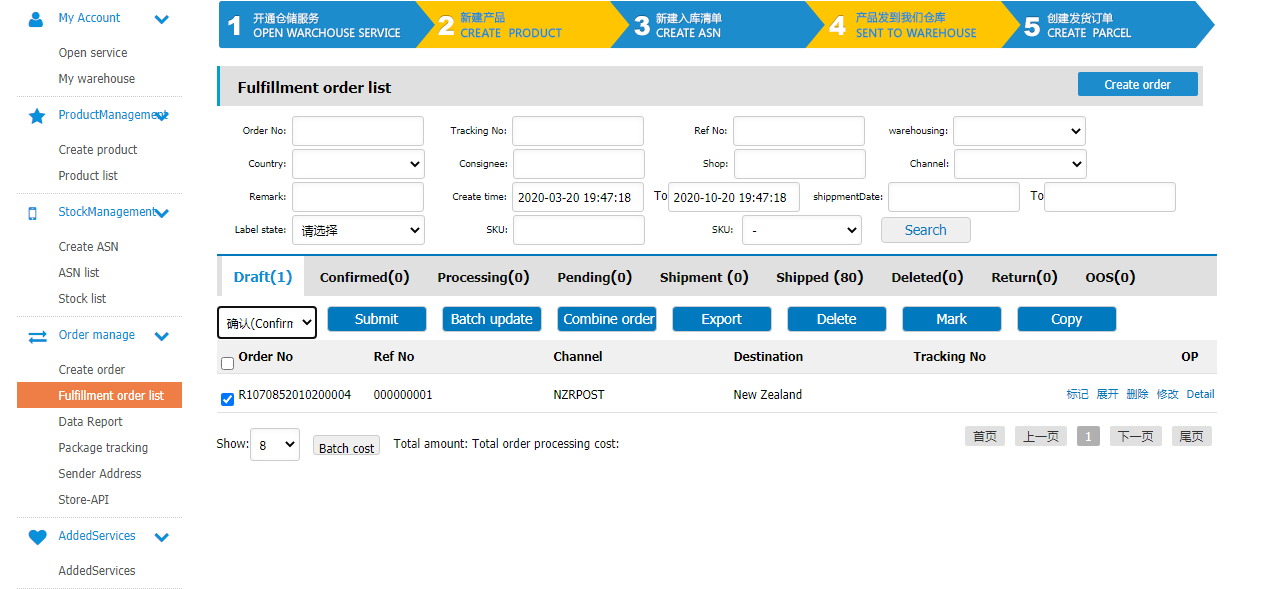
You can probably write some unit tests to test if it works and as part of CI. For now, I will test it as a user by creating an order from Woocommerce and observing if that order gets created in PFCExpress platform.
If all works, you should see a new draft order in the fulfilment tab on PFC Express platform. Remember type 1 is fulfillment which you can find in the fulfillment tab and type 2 is normal order which you can find the manage orders tab. Unfortunately, the order that gets created is a draft. I have tried setting the orderStatus to 2 - assuming that is to set to confirm, but it doesn't work. In the end, you will need to manually submit the drafts for fulfilment.